photo LFD-header_zpsrtqgwepm.png
 photo home_zpsbeyvjzpc.png  photo story_zpsryll93pv.png  photo church_zpsutjg0pcs.png  photo vintage_zpsrnxzz1s4.png  photo mosaics_zpslhx9tjaj.png  photo gallery_zpsrtj0zvcz.png
Showing posts with label projects. Show all posts

Wednesday, March 09, 2016

Tales From a Treadmill


When I found out I was pregnant with Whimsy, I insisted on getting a treadmill.  I knew that even if I ate steamed broccoli and grilled chicken for the duration of my pregnancy, I would be packing on at least 50 pounds and being 40 while trying to lose that baby weight wasn't going to be much fun, so I turned to Craigslist, as I often do.  And let me tell you, when I was 42 weeks pregnant and about to be induced, I got on that treadmill and decided I wasn't getting off of it until I went into labor.  Voila! Whimsy made her appearance about 8 hours later.

Now that Whimsy herself  is running around and poking her nose into everything, I have to steal time on the treadmill whenever I can.  I steal it from the 14 year old who would rather just leave for school early instead of helping with his baby sister. And I steal it from my work-time, too and this is how:


 I was reading Gretchen Rubin's Better Than Before about the formation of habits and she weaves a little story about her sister into the book.  Her sister is a diabetic and a tv show writer, which is a pretty bad combination.  So she gets her sister an expensive contraption called a "Treadmill Desk."  As soon as I read that combination of words,  a light went on in my head and I was off to Pinterest to see if my regular treadmill could be converted into a treadmill desk.  It turned out that with a pine board and two metal cuffs, I could indeed achieve a desk for my laptop where I could walk and do mindless things I normally would be sitting down to do.


I don't have to tell you that walking, even walking slowly, is so much better than sitting at a desk for hours.  I get bonus points by having my treadmill in the sunny window where I work on my vitamin D production at the same time.  I find that at 2.5 mph, I can still type fairly easily as well, so I'm able to send email, blog, and work on other written projects like Etsy listings.  I don't feel guilty for taking time to scroll through Facebook and Instagram, since I normally would just be sitting around doing those things and now I have the added bonus of getting in some much needed exercise.  It really just makes a lot of "guilty" activities seem not so bad.


The desk is easy to slip on and off.  When the desk is off, I can run, walk, pray, listen to the Robcast, and sometimes just escape from the world.  When the desk is on, I can work while walking, or if I'm not actually walking, it's a great height for packing Etsy orders and holding my scales for weighing the finished packages.  I have less than 10 dollars in the desk, but I have gotten so much use from it.

We have too many modern conveniences to get the exercise we really need. This is how I am fighting the tendency to be sedentary.  It's not easy to squeeze some quality movement into the day, but my treadmill desk is a good way for me to do the things I normally do with the added benefit of moving.

Now, if I could just come up with a way to get the windows washed while I was reading a book....that would be some clever multitasking...


Monday, February 22, 2016

Mosaic Flower Pots


Few mosaic projects are more satisfying and practical than decorating a basic terra cotta flower pot.  I've probably lost track of how many of these I have made over the years, but I'm sure it is in the hundreds.  Here's how I made the most recent batch, which are actually all sold already.  As I make more, feel free to ask for any colors or themes you would like me to make for you! 


I begin with playing with patterns and colors, laying dishes out on the floor so that I can get enough distance to imagine how the colors will interact on the surface of the pot.   This is a skill that improves with practice.

As with anything creative, it is nice when you feel inspired.  Unfortunately, I was not feeling it with these pots.  The weather was cold and my family was sick and I was weary at the thought of spending time in the studio on several of the nights I normally work.  But the more practice you put into your craft, the more you can work from a place of experience and instinct without the warm comfort of the Muse cheering you on.

The next step is to begin cutting the pieces and arranging them. I use several different kinds of nippers to get the size and shapes I need.  (I've written about my nippers before in this post.) I use tile adhesive in a cake-decorating bag to apply glue.  It has a creamy peanut butter consistency and a perfect working time of about 30 minutes.


I confess, I was not as happy with the pots at this point as I thought I would be.  But it is important to allow room for your ideas to unfold and be what they are. Grout has the ability to change the entire mood of a piece, so I waited for a nice day when I could open the garage door and really see the colors.
bahama beige grout
white grout
gray grout


I ultimately chose to use three different colors of grout: Bahama Beige, White and Gray, all in the sanded version (I personally hate the consistency of unsanded grout and try to never use it)  Once the grout has cured a bit, I add a spray sealer to the exterior and the interior as well. 


 I have several pots that I made at least 5 years ago that I use for myself.  The blue ones (which were on the windowsill inside and the dogs knocked over and cracked, so I kept them instead of selling them) have been outside on the covered front porch for years now.  They have held geraniums, marigolds, pansies, vinca, and mums almost non stop, and though they are dirty, they have not eroded at all.  I also have large pot inside that holds my aged Christmas cactus.  It's been in this pot for about 5 years as well and though I forget to water it sometimes, it has seen plenty of moisture at other times (I put it outside in the summer) and has stood up to time, dirt and water very well.  I don't ever suggest that my pots be left in the elements to freeze, of course.  

So if you are wanting to try making a flower pot yourself or if you would like me to make one for you, this is how it is done!   Enjoy! 
these are medium and large flower pots
which currently sell for 35-48 dollars each
and come with a corresponding plate or saucer

Monday, April 27, 2015

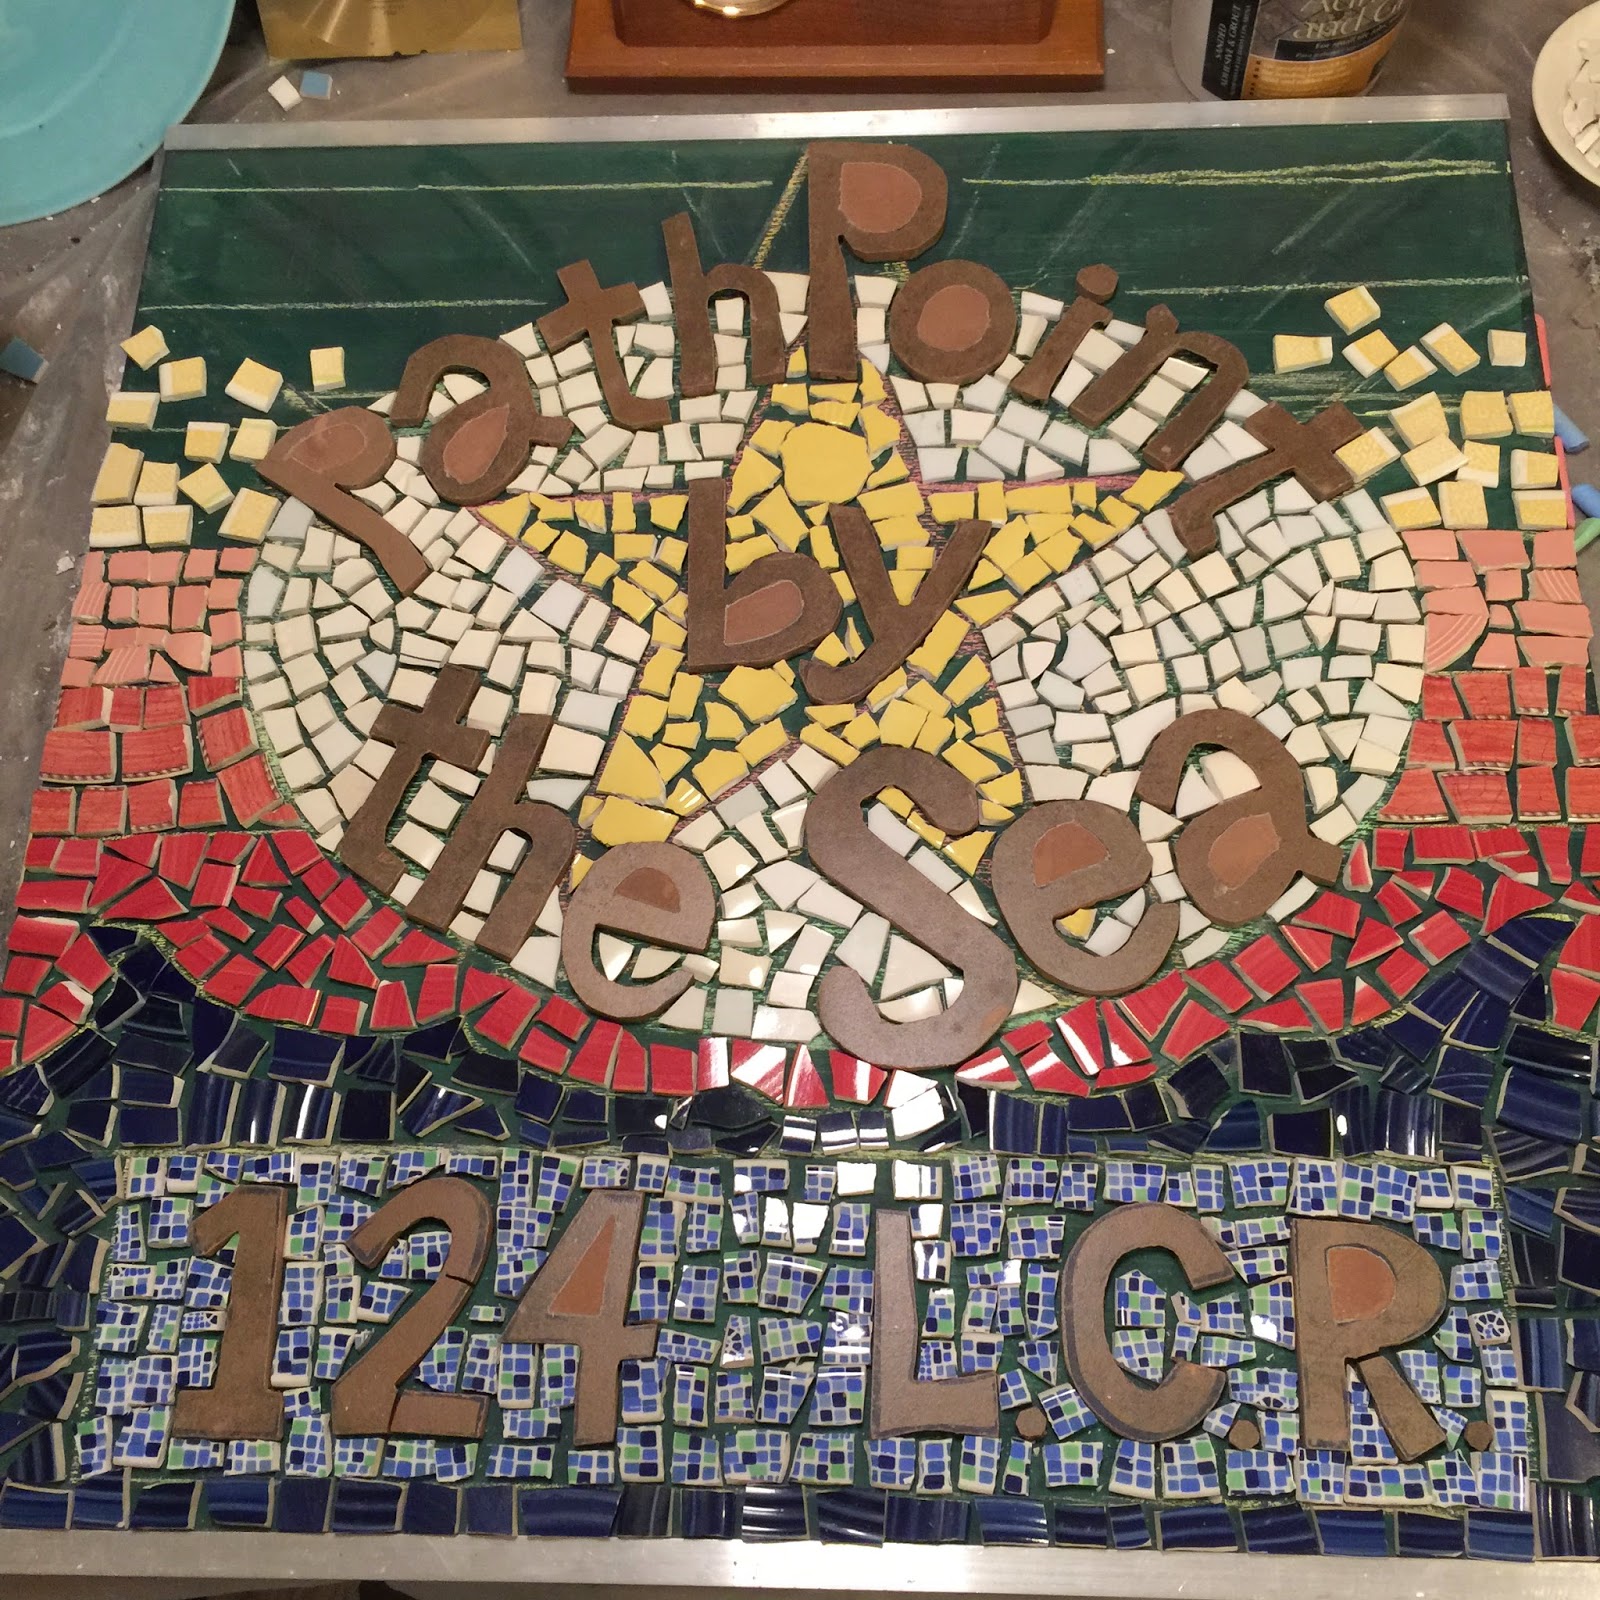
Broken China Mosaic Cottage Sign - Two Years in the Making

More than two years ago, my friends asked me to make a mosaic sign for their cottage on Cape Cod.  I love making custom orders, but I always quake inside after making one, worrying that my idea and the client's idea might be too different (so far, that has only happened once, but it was not fun).  Making a custom order for a friend is even more intense because I want a level of perfection that I am never sure if I can deliver and my friends probably never even know I am shooting for. This leads to the inevitable procrastination that most artist struggle with.  In this case, that procrastination had some benefits:  in that LOOOOOONG  process of developing this piece, I created a new technique, found two new products that change the way I work, and ultimately ended up with a piece I couldn't have made two years ago.

my original sketch, from two years ago
We started the collaboration with a peek inside the cottage, which is decorated with beach-y pastels. My friend showed me a collection of signs he liked for inspiration. From there, it was a long wait, because I had just started to mosaic with words and was experimenting with techniques for the best readability.  And then I got pregnant with Whimsy and that REALLY slowed things down, because by that time I had begun cutting letters out with my wet saw.  A session with the wet saw means suiting up in a plastic apron because it sprays water all over the place, not to mention boots and safety glasses.  These aren't fun to wear in the hot summer months, but they are even less fun in the cold.  I couldn't reach the saw well enough with a giant pregnant belly and then I couldn't find a time when the baby was sleeping, but also somebody was home to help take care of her because the saw would wake her up.  It took a long time, but eventually, I got the letters for the double-sided sign all cut out of tile remnants I found at the Habitat Re-Store.  I chose the dark sandy color with an idea of how I would fill out the other colors, but once I cut them out, I realized my original idea was never going to work and had to abandon that idea. I also realized I wouldn't be happy with the sign unless both sides looked exactly alike. My lettering is usually free-form, but I would need to make them match, so I did a lot more drawing and guessing about the sizing, which is frankly just a lucky guess, ultimately. The other labor-intensive part of the lettering was using the Dremel to carve out the interiors of the letters. I didn't cut all the way through these, but rather just took off the glaze, which I knew would capture some grout during the final steps and add a nice weathered texture to the final project.
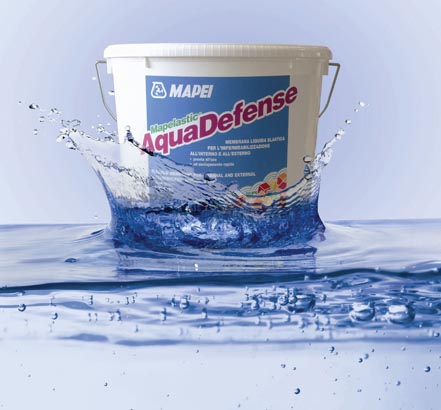
The other big challenge for the sign was creating something that would survive the elements of a northern beach.  I have finally developed a technique for mailboxes using silicone to attach the china, which allows for expansion in temperature changes. But that is on steel.  I would need to base the sign on wood; and wood and weather don't mix.  I knew from you-tube videos that there was a product that I could coat the wood with to repel moisture, but it took me more trips to Lowes to actually FIND this product than I care to admit.  I was thrown off the hunt because the video I watched showed a product that was pink when wet and dried purple and this product was green and turned a darker teal when dry. Also, the product in the video appeared to be rather gummy and this was more like a finger-paint consistency. And sidenote: after asking literally dozens of male salespeople for help in finding the product, it was a female worker who finally helped me find the product I needed, which had been under my nose in the flooring department the whole time.  (Sensitivity training in home-stores should be required. I can't tell you how many times I've been asked just what "my husband's project" is. A little pet peeve I should write about in another post. I digress.)

With a suitable weather-proofing agent found, I could use a simple birch board as the base for the mosaic, instead of a cedar board, which I couldn't find in my local home-store in the dimensions I needed.  This kept the sign from being too thick and too heavy. I should note that in hindsight, I wish I had attached the eyehooks for hanging at this point, but I was still shopping for sign holders at this point, and was uncertain about the placement.  I ultimately decided that there were more sign-holder options than sands on the shore and I decided to just make the sign and let the sign-holder be a secondary project.

Next came the layout plan.  Since my original sketch did not include all of the words that my friends wanted on the sign, I needed to do a lot of tweaking.  The color of the water-proofing agent really distracted me and more than once, I thought about painting over it with white paint just to help me with the layout. Everyone always asks how long a mosaic takes to make, and this is the time I always think of when they ask. It involves a lot of moving things around, standing on chairs and squinting. In this case, several four-hour sessions passed before I landed on a layout I deemed suitable.  It needed to be friendly, but not juvenile or crafty; and it needed readability without sacrificing beauty.  It should feel like a beach-cottage without being cliche'.  Finally, it needed some structure, or else it was going to be the worst thing ever... boring.

In studying the inspiration signs we first looked at, I noticed a star as a nautical motif that wasn't completely overwhelming and it provided the structure we needed.  Drawing a star on that scale really made me wish I had paid more attention in geometry class.   I finally abandoned my ruler and compass and went with free-handing and eyeballing.  You
know...really technical.

This started the exploration of color and pattern that would have me trying on dishes like my daughter tries on outfits in the morning.  More standing on chairs and squinting, more questioning the universe, and second guessing my life-choices and abilities.  This is the part of the project when you are fully convinced that you are over your head, you will never make this work, and you have made a huge mistake.

So you eat some chocolate and keep at it.  You can give up at this point and take a break, but I have found that this is pretty much the moment when success kisses failure.  If you walk away, you only prolong the agony.  Better to breathe through the pain and hope the labor isn't too long.

no.
no.
no

maybe.


I was a little fixated on the address part of the sign "124 L.C.R" being done with the mosaic dishes, by Pier One.  They literally look like small mosaic tiles. I wanted them to be a nod to my client's love for New York City and the subway signs there. The "sign within a sign" was also one of the motifs in the inspiration pictures.  It's a small allusion, but it was a big deal to me.

At this point, I knew I was close, but it was still lacking the real flourish it needed.  I don't know what set off the sunset gradient idea, but maybe it was my own honeymoon on Martha's Vinyard.  We stayed long enough to watch the sunset before taking the ferry back to the mainland, and consequently almost ended our week-old-marriage by falling asleep at the wheel on the drive back to our Scranton apartment.  

So starting with the cobalt waves, I used some Fiestaware and some not-so-Fiestaware to create the blue.

Next, I use a lovely rare coral-red dish, with a hand-painted effect. I topped this with a salmon color, which has an antique wood crackle design, made by Wedgewood, "Sara's Garden." The pink is a 1950s Luray Pastel.  The yellow is by Royal China, c. 1960s. 
Above the yellow, I used J & G Meakin, English Staffordshire Sterling "Renaissance;" one of my favorites of all time. Green and blue come together in the next pattern, also by Royal China, c. 1970s. I topped it off with a sky blue, unmarked mid-century dish.  Top and bottom are capped with an aluminum channel to help with moisture and to give the eye-bolts strength. To each side, I added a series of small aluminum squares. These are the remnants from the process of making decorative aluminum railings. A sweet friend of mine gave them to me to work with after her husband passed away. It was his business in New Jersey that produced the oddly dimpled little bits of metal. I applied them with silicone glue as well.

Finally, I grouted the piece in white, and applied the eye-bolts. I then added some more silicone to the top seam to divert moisture, and sealed the entire piece, front and back, with professional grade sealer.   I also added a bit of acrylic paint to the interiors of the letters, which will certainly wear over time, adding a nice patina of age that seems appropriate. 


I can't wait to see how it looks in its new home.  Packing up a piece of this size feels a little bit like shipping one of your children, and I am resting better now that I know it arrived safe and sound at its destination.


So now you know how a double-sided mosaic sign is made and you can order one for yourself.  It probably won't take me two years to make another one. Probably.

Wednesday, July 11, 2012

Bedroom for the Boy

The last baby I birthed did a terrible thing the other day and turned 11. ELEVEN.  He had a party with his buds and I was pretty amused to look back and see that the guys that he had for his 7th birthday were the same guys he had for this one with a few additions. 

For his birthday, I re-did his bedroom, which he has been asking for for months.  He's a really sentimental kid (I wonder where he gets that?)  and he has all kinds of trinkets, souvenirs, pins, ribbons, cards, posters...in short clutter. He also has all of his Dad's
Cleveland Browns memorabilia from when he was a kid. This was a good opportunity to sit down and have a chat about how too much stuff can weigh us down and actually keep us from being happy.  We decided to go through his bookshelf and his other stuff and pare down.
Before

After
So here is the finished product, complete with a new roller shade I made-over with an old map...a project I have wanted to do for no less than 4 years.  I'm creative but not terribly efficient. It happens. We chose a pale paint color called "Quiet Rain."  We entertained the idea of an orange, but decided that this kid did NOT need more stimulation in his bedroom, as he struggles with insomnia sometimes. 


The Boy in his natural environment.


Thursday, March 15, 2012

Cedar Raised Garden Beds on the Cheap

Pinterest is not a total waste of time. So far, I have used at least three ideas for my own purposes and here is one that I am pretty proud of. 

The original idea came from a blogger in Alaska who used replacement cedar boards to make her raised beds. Somehow that translated in my head to a panel of cedar fencing. I'm not sure how that happened, but it was a happy accident because it ended up working pretty well.

I'm not doing a how to because I forgot to take "during" pictures.  Suffice it to say I special ordered one panel of cedar fencing (cedar, not treated which is poisoned or pine, which will rot).  It cost 89 dollars.  Looking for a pic today, I see they are on sale now for about 50. (facepalm).  The point is that it was a basic panel of fencing that looks like this on the back with three supports running horizontally.   Big thanks to our friend James who went to pick it up with Robb in his truck.

We pulled the supports off and cut some of the boards into two foot lengths for the sides of our boxes.  Then we cut the supports 16 inches long to be the corner pieces. We will bury the extra depth to keep them from blowing away in our weird Arkansas weather.

For our money, we got three 6 x 2 foot boxes that are 11 inches deep for about 30 dollars each. Compared to some of the kits we saw online (which were as much as 200 dollars a kit or more) I think it was a pretty worthwhile project. It took about three hours, but that was only really because our circular saw is sad and nearly unusable. If we had a more functional saw, I suspect they would have really only taken about 20 minutes each and also we would not be nearly as sore the next day....

I spent Tuesday gardening and got my first sun of the season.  I transplanted the blackberries and raspberries I had against the side of the house to make room for the raised beds. I moved two rosebushes and another bush from the front window where they don't get enough sun. I planted snapdragons, moved a section of chain-link fence, tried to work on our lousy front gate which is worthless, laid down weed-barrier under the new raised beds and around the air-conditioning units (no more weed-wacking the dang wires!) and mowed the back yard.  It was a thrill. 

Now we just have to plot with some of our garden friends to share a truck to get a load of compost for our raised beds.  And I just pinned a few other ideas I'm dying to try...

Monday, October 31, 2011

How to Make 3 Halloween Costumes for Less than 20 Dollars

I love making Halloween costumes.  I don't know why.  I just get a kick out of it. But the challenge to me isn't how elaborate I can make a costume, but rather, how can I make them out of the cheapest materials possible. I think I did all right this year:


Behold, the Paper Doll:

We made this from scraps of fabric I had on hand,
a swatch of butcher paper
two sheets of poster board
spray adhesive
hot glue
and bias tape
and a feather from my feather duster

What I like about it:
1. Mattie designed the dress herself
2. It isn't ridiculously sexy for a young girl.


 Look out for the LegoMan:

I made this from an empty cheese ball container (from Sam's)
a foam life belt from the thrift store (99 cents)
the bottom of an oatmeal container
two plastic drink cups
lots of hot glue
Krylon spray paint for plastic
and a circular metal candle holder that I cut in half to make the curved hands.


The only problem with this costume is that he can't use his hands much.  But it turned out pretty cool.


And that brings us to Tinkerbell.

Charleigh always thinks up cool things that she wants to be for Halloween.  The other two labor over it, auditioning ideas for their cool factor ...and I have to shoot some of their ideas down, like when Vin wanted to be Neil from Dead Poet's Society. (Not an easy one to explain at a stranger's front door.)  But Chuck usually just pipes up sometime close to Halloween what she wants, typically low maintenance.   So when I was in the thrift store the other day and a pair of fairy wings brushed my arm on the half-off rack, I was all over it.  The wings turned out to be attached to a very cheap and flimsy green dress or shirt which reeked of BO.   I took it home, took the wings off, soaked it in a vinegar bath and it turned out fine.  At the thrift store, I also found a pair of camo ballerina flats, a big yardage of green felt for a dollar and a little piece of gold lame' for 25 cents.   


I'm not a great seamstress, but I tweaked the dress into a shirt and a pair of pantaloons, and the felt into a tunic, to which I sewed the wings (which worked much better since the felt has more body than the flimsy stuff).  I used a couple of scraps to make rosettes on her shoes and some more scraps for hair-bows.  I also made a little over-skirt with the gold, trying to give her some warmth in layers.  Finally, I bribed her to eat her eggs this morning by telling her she could wear some green eyeshadow.  Done.

And that, my friends, is three cute costumes on the cheap.


Monday, September 26, 2011

Today's Project

With just 10 working days till the show, this is what I'm starting today.  This is the before shot. Hopefully I can make the after look like what I see in my imagination....

Tuesday, September 20, 2011

How To Mosaic - How Do You Get the Pieces Even?

Another question people always ask me is is "How do you get the pieces like that...all even?"  Or it's slightly annoying counterpoint, "You just smash all those dishes, huh? Just throw 'em on the ground...must be a great way to relieve stress."

On the contrary, I do NOT just smash dishes. Maybe I did that once with one stack of plates because I may or may not have been having a full on yelling fight with my husband, but it really didn't make for much of a controlled mosaic and it certainly didn't do much for the conversation. Except maybe, he knew I don't normally do that to my plates and realized how ticked I really was. (Oh yeah, news flash.  Deliriously happy couples also have good old fashioned air-clearing fights once in a while. But that's a whole other post.)

hammer smashed shards make ugly mosaics
If you google "how to mosaic" at all, you are going to get a really crappy tutorial about just putting any old dish stuff in a pillowcase and tapping them with a hammer.  Guess what?  That looks ugly and sad. And it shreds the pillowcase to pieces, which I don't think they make very clear, either.  I know that's not what you want to make. You want to make something pretty. So they will tell you to use proper eye protection and blah blah blah, but they don't tell you how to make a pretty mosaic.

If you want to make a controlled pattern and get the designs from the dishes that you really want to display, you will need the proper tools.  You need different tools for different kinds of dishes.  And you need to be able to tell the difference between the different kinds of dishes.  I'm here to help you.

porcelain is translucent
This isn't precise, but there are about three different kinds of dishes that you will encounter:  Porcelain, china and pottery.  That's not entirely precise, but it's a good basic breakdown. Porcelain is generally very thin and is translucent. You will know it is porcelain when you hold it up to the light and you can see light through it.  (Confusingly enough, some handmade pottery is also made of porcelain, but that's also a whole other post.)  For mosaic purposes, porcelain is generally thin, often made in Japan or England, and is great for mosaics.

there is one porcelain plate in the stack...can you spot it?
China is a generic name for ironstone, earthenware, dishes, restaurant ware, vitrified china, ceramic, etc. It is made in various ways over the years, with a lot of different kinds of density. I won't bore you with the details, but this is basically what you are going to find on the tables of most people. And some of it is great to mosaic with and some of it lousy.  It will take you lots of time and practice to figure out what you like to use and what you don't like to use, but if it has some flat surface to it, you can probably use it.

handmade pottery
Pottery is made of clay. Porcelain clay. Or other kinds of clay. But it is generally thicker and sturdier than china. Pottery is wonderful but hard to mosaic with because it's thick to cut and when it's handmade, isn't uniform in thickness. If I'm going to hammer-smash anything, pottery is probably it because you get really tired cutting thick pottery after a very short amount of time.


Now, there are two kinds of cutters. Tile nippers and rotary cutters.  Tile nippers have two flat nips that look like teeth. Rotary cutters have two wheels. You use a rotary cutter on porcelain and tile nippers on china and pottery.  You can also use a rotary cutter on most china, but not on pottery. It is probably going to be too thick for the wheels to get around.

You cannot use nippers on thin porcelain. It will make you cuss.
my collection of cutting tools
Tile nippers shatter porcelain into shivers and weird shapes.  Porcelain is just too thin for the nippers to pinch the porcelain into a clean break.

 So just to sum up: Nippers for china and pottery but not porcelain; Rotary cutter for porcelain and china but not pottery.

You can get tile nippers from the tile department of a hardware store. I got my rotary cutters from a craft store.  They cost between 12 and 15 dollars each. (Unless you get your nippers from the thrift store for a mere $1.75 SCORE!) 
To cut with nippers, you put the nippers teeth perpendicular to the edge of the dish.  I generally try to cut a plate in half, then quarters, then eighths.  It doesn't always work, but you get a better cut when you keep cutting your pieces in half than if you try to cut off just a bit at a time off a large piece.  I have cut thousands of dishes now, so I've had lots of practice, but it doesn't always go the way you want it to. The more you know the kind of dish you have, though, the better your chances of making a good cut from the get-go.

I have several pairs of nippers. They get worn down after a while. But the worn ones are good for thicker pottery. The newer ones are good on thinner china. Robb got me the set on the right for Mother's Day five years ago now and just see where they've taken me.

To cut with the rotary cutters (which you could also use on glass. I just don't like working with glass very much.)  you line up your wheels deep into the place where you want the cut to be.  Nippers start a crack that becomes the break.  Rotary cutters actually cut into the porcelain and pinch it apart.  You get a good, controlled cut with rotary cutters, but they take a lot of practice.  The screws that hold the wheels on get loose and you have to tighten them pretty often (the wheels are adjustable so you can make beveled cuts).

And there you have it. The right materials, the right tools, lots of practice is how you get those nice even pieces for your own mosaic projects.  Happy nipping.


Blogging tips